Community Tip - New to the community? Learn how to post a question and get help from PTC and industry experts! X
- Community
- Creo+ and Creo Parametric
- 3D Part & Assembly Design
- Tolerances - How To Choose Approriate Values
- Subscribe to RSS Feed
- Mark Topic as New
- Mark Topic as Read
- Float this Topic for Current User
- Bookmark
- Subscribe
- Mute
- Printer Friendly Page
Tolerances - How To Choose Approriate Values
- Mark as New
- Bookmark
- Subscribe
- Mute
- Subscribe to RSS Feed
- Permalink
- Notify Moderator
Tolerances - How To Choose Approriate Values
Tolerances. How do you choose their values for things that are not critical? Do you treat the tolerances as a 'target to shoot for' or 'hard limits' that if exceeded by any amount constitute a rejected part?
ASME Y14.5 2018 defines a tolerance this way:
So how do you determine the actual limits of a feature, and how do you communicate your 'preferred size range' for a feature if different than the limits actually applied?
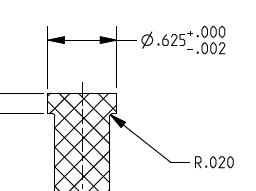
Take the top of this headed punch for example:
The .020 fillet has a title block tolerance of +/- .005 which means anything between .015 and .025 is 'in spec.' Does that mean we should scrap or reject something that comes in at .012 or .027? I can't imagine we would since this is not a critical feature. Even with the .625 dimension (which is much more important), if one of them arrived from a vendor at .6229 or .6251, I don't think we would reject it, even though by definition it is out of spec.
How do you handle this? Do the tolerances you apply to your dimensions really define the hard limits of those dimensions, past which you will reject the part regardless of how small the deviation? Is there some way to apply tolerances to communicate a 'preferred' value? Do you tolerance for the 'worst possible condition that can possibly work' or 'what you really hope will arrive'?
- Labels:
-
2D Drawing
-
Assembly Design
-
General
-
MBD_GD&T
- Tags:
- tolerances
- Mark as New
- Bookmark
- Subscribe
- Mute
- Subscribe to RSS Feed
- Permalink
- Notify Moderator
If the dimension is not critical to function, should it be on the drawing or inspected? I would argue that the .02 radius should not be on the print, perhaps you could specify it as a max radius permitted.
In your example I would open the tolerance based on a sample size of a minimum of 35 pieces used to calculate the six sigma tolerance if I were to leave it on the print.
We tolerance based on mechanical design for six sigma yields of parts and assemblies. Not all parts and assemblies have a rolled yield of six sigma but it is always the goal. A continuous process improvement approach is required of all production suppliers.
Functional design requirements are determined and then manufacturing processes are selected that are capable of maintaining the required tolerances.
In the design for six sigma context all dimensions included for inspection should be toleranced based the process capability used to create the part dimension. These are hard limits and suppliers are required to submit reports with the CP and CPk data for all inspection dimensions. All parts can be within tolerance but if the CP or CPk is out of spec then a corrective action report is issued to the supplier and they must respond with a plan to fix it quickly. If any inspection dims do not meet the required criteria then the entire lot can be rejected. We typically only include critical to function dims on the inspection drawings along with a note requiring that the parts be manufactured to database along with a tolerance block that is based on the manufacturing process capability (i.e. die cast, injection molded, formed metal etc.) this block applies to the CAD model globally. The tolerance table typically has many values based on a range of the nominal dimension. The format is something like 0-1mm +_.027 mm 1-2 mm +_ .054 mm etc.
The tables have differing classes for general, precision and the like with different tolerances values for the nominal ranges. A lot of work up front to set this up but it makes for much less ambiguity with suppliers about what is required.
If we have a dimension that is out of spec but not affecting function, we have a process to issue a waiver to accept the parts. In reality if a wider tolerance does not affect the function then the tolerance should be widened. Use of this type of waiver is quite rare.
Involute Development, LLC
Consulting Engineers
Specialists in Creo Parametric
- Mark as New
- Bookmark
- Subscribe
- Mute
- Subscribe to RSS Feed
- Permalink
- Notify Moderator
A lot of this has to do with the qty's you are talking about. I've worked in manufacturing where they build production line qty's of a product but my current position is much more of a built to order, with qty's, at least for my parts, that are closer to 1 than 10 most of the time.
We require 100% inspection (usually from the vendor). It is pretty common at my facility that if a part is "out of tolerance" that engineering gets involved and we will help determine if the part is rejected or accepted. When you are only building 1 or 2 of something, it's a different mindset.
We have written processes (ISO compliant) for all of it.
- Mark as New
- Bookmark
- Subscribe
- Mute
- Subscribe to RSS Feed
- Permalink
- Notify Moderator
I guess I should provide a little more context. The picture above is a piece of tooling. Typically every piece is unique and only one is required in the final assembly. (If it's perishable then we will order spares, but the total quantity of each will still be very low, typically 5 or less.) We then assemble all this tooling and use it internally to produce the actual parts that we sell to our customers. The tooling is part of our internal production process, it's not being sold to anyone.
While tool designers are certainly looking at the fits between mating pieces of tooling, no one is performing any type of six sigma tolerance analysis on anything. Every design is a 'one off'. The goal is to get the design through engineering as quickly as possible so the tools can get ordered and built. Think of this process more like custom job shop work where both the design and build are unique, and once finished everyone moves on to the next thing.
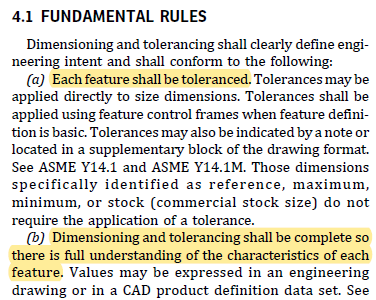
As far as leaving non-critical features undimensioned, that would violate ASME Y14.5. Every feature must must have a tolerance:
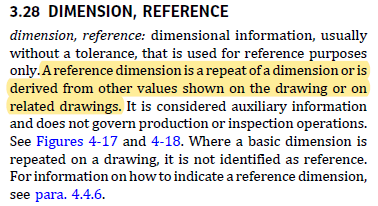
I toyed with the idea of using reference dimensions, but that doesn't fit with the Y14.5 definition either since that radius (for example) can't be derived from anything else:
It seems like we really have two different tolerances - one that we prefer and one at the very limits of what will function. The tolerances currently applied to the print reflect the preferred size, but are not necessarily indicative of what will actually function.
All of this is really coming to light because of a new inspection machine we are implementing. In the past people would just check tools manually (micrometer, trace form, etc.) Now we are adding a vision system that can inspect an entire piece of tooling in only a few seconds. Suddenly many of these dimensions that didn't get a lot of attention before are now shown as being out of spec. Will they work as is? Probably, but no one is excited about opening the tolerances up because everyone thinks about them as the 'preferred size' or target to shoot for.
My real struggle is trying to decide where the cliff is to reject something. At some point a decision has to be made. If the tolerance says a dimension can't be larger than .625, do I reject it if it's .62501? What about .6251? .6259? .626? If .626 really is okay, and I adjust the tolerance, do I then reject it if it comes in at .6261? That is what I'm trying to figure out.
- Mark as New
- Bookmark
- Subscribe
- Mute
- Subscribe to RSS Feed
- Permalink
- Notify Moderator
I have see some drawings where they have the blanket statement "Reference CAD data for dimensions not shown". Could you incorporate a tolerance into a note like this?
I have also see a critical dimension symbol on those "critical" dimension. Maybe add these to ones that cannot be overstepped.
Those dimensions also depend the industry in which you are working. When I was in the boiler industry, it was heat it and beat it. But all the welds were X-rayed. I don't think the space industry would go for that.
- Mark as New
- Bookmark
- Subscribe
- Mute
- Subscribe to RSS Feed
- Permalink
- Notify Moderator
It would seem you are in need of go/no go conditions. I have done this with fixturing for things that are tedious to inspect but that does not make sense for only a few one-off pieces. For your scenario I would use worst case 2D tolerance analysis to establish the limits.
ASME Y14.x at some point I think allowed for CAD data to be part of the data set. By using a global tolerance table(s) applied to the CAD model that will minimize the dimensions required on the print. A note on the print to cover this should be compliant with the standard. We only included process control and inspection dimensions on prints, nothing is fully dimensioned on a drawing as the CAD model is the controlling data set.
Involute Development, LLC
Consulting Engineers
Specialists in Creo Parametric
- Mark as New
- Bookmark
- Subscribe
- Mute
- Subscribe to RSS Feed
- Permalink
- Notify Moderator
We fully dimension our drawings. We do not provide cad data to vendors unless they specifically request it but we also state that the drawing is the controlling data so any descrepancies they have between the model and the drawing is controlled by the drawing.
We tolerance to what we deem reasonable, not to the "worst case". Any deviations from print tolerances are handled via a deviation request, case-by-case. Engineering has the final decision on these.
- Mark as New
- Bookmark
- Subscribe
- Mute
- Subscribe to RSS Feed
- Permalink
- Notify Moderator
@StephenW wrote:
We tolerance to what we deem reasonable, not to the "worst case". Any deviations from print tolerances are handled via a deviation request, case-by-case. Engineering has the final decision on these.
I think that's probably where we will end up as well. Leave the tolerances as our 'goal' and then let someone manually make the call when stuff is out.


