
Turn on suggestions
Auto-suggest helps you quickly narrow down your search results by suggesting possible matches as you type.
Showing results for
Turn on suggestions
Auto-suggest helps you quickly narrow down your search results by suggesting possible matches as you type.
Showing results for
Community Tip - Want the oppurtunity to discuss enhancements to PTC products? Join a working group! X
Options
- Subscribe to RSS Feed
- Mark Topic as New
- Mark Topic as Read
- Float this Topic for Current User
- Bookmark
- Subscribe
- Mute
- Printer Friendly Page
PIPE SOLID ISSUE
Apr 23, 2013
10:15 PM
- Mark as New
- Bookmark
- Subscribe
- Mute
- Subscribe to RSS Feed
- Permalink
- Notify Moderator
Apr 23, 2013
10:15 PM
PIPE SOLID ISSUE
Hello ALL
I would like some inputs on how you use Pro-Piping with Windchill. It
looks like Pro Piping may have issues with Windchill. When creating a
pipe solid feature pro piping creates a new part to place the solid
feature in. Pro Piping will not use the same part file again to create
solid pipe features in. If pipe solid fails, which they sometimes do
and you ever delete the pipe solid, pro piping will force to create a
new part file number to place the new solid pipe feature in. Windchill
tracks all part names and will not let you create a pipe because part
name is in use. You have to create a new part name. This can be a real
problem for configuration management and drawings! You cannot delete
the pipe solid part from Windchill, if it is on someone's workspace
etc..., deleting a part in Windchill is basically impossible.
My question is why does Pro-piping not
just give me a warning, "pipe solid part already exist,
overwrite/update? Yes, No" Any better work around or config options out
there would be appreciated?
I am facinng this issue now, How to replace all that in windchill existing part?
Could anyone help with this to fix?
Regards
Viswanathan.K
This thread is inactive and closed by the PTC Community Management Team. If you would like to provide a reply and re-open this thread, please notify the moderator and reference the thread. You may also use "Start a topic" button to ask a new question. Please be sure to include what version of the PTC product you are using so another community member knowledgeable about your version may be able to assist.
1 REPLY 1
Apr 26, 2013
11:47 AM
- Mark as New
- Bookmark
- Subscribe
- Mute
- Subscribe to RSS Feed
- Permalink
- Notify Moderator
Apr 26, 2013
11:47 AM
Hi Viswanathan...
I definitely understand the issue and I concur there should be a better way to handle this situation. I'm not sure what the solution is but there is a way to work around the issue. It's a bit of a chore but it does alleviate the problem if you're willing to do the extra steps.
Assuming you already have a piping assembly with solid pipes that have been saved and checked in, try this procedure to fix failed pipes (or to Erase them and re-Solidify them later):
- Open your piping assembly. Take note of the file name of your failing pipe solids. Go to the Fabrication->Pipe Solid tool and Erase the failed pipe. Alternately, delete the failed pipe solids from your model. It's imperative that you record the file names so you can reuse them later.
- Save your piping assembly. This step isn't required but it's good practice to save at this point.
- Remove the failed pipe solids from your Workspace. Leave the piping assembly and all other components. You should be able to remove the solids especially if you've saved the piping assembly. (You should be able to remove them anyway but saving the piping assembly without the failed solids is still a good practice).
- Fix any problems and go back to Fabrication->Pipe Solid to make new pipe solids. Enter the same names as the old/failed/removed pipes. Because the failed solid are no longer in the workspace, you will be allowed to do this. Do not save your assembly at this point.
- Retrieve the failed pipe members back into your workspace using the Add to Workspace option. I realize this seems to make little sense. You needed to remove these members before you were allowed to reuse the names but now you need them back again so you can overwrite them and check in your new pipes. There are some things to watch out for here:
- Different compaies have different Windchill settings for the Add to Workspace command.
- In some companies when you Add to Workspace, the default setting is to overwrite existing files already in the workspace.
- At other companies when you use Add to Workspace, no files will be overwritten unless the user specifically requests it.
- Be aware of these differences and adjust accordingly. You should have no problem putting the failed pipes back into your workspace if you removed them in Step 3.
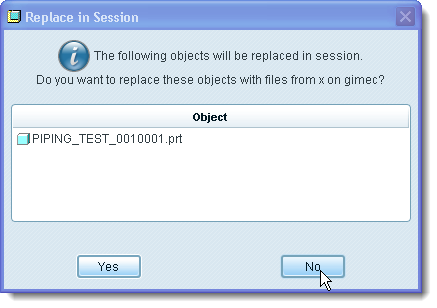
- When prompted with the Replace in Session window (shown below), select NO. At this step, Creo is attempting to put the failed pipe back into the assembly. We do not want this. Instead, we want to keep the new pipe in the assembly so we select NO. The failed pipe will still be placed into your workspace, but the new pipe will remain in your active piping assembly.
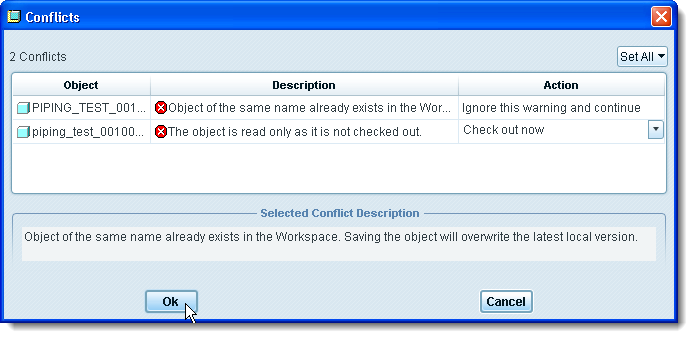
- Save your piping assembly. This will save the new pipe and overwrite the failed one in your workspace. Depending upon the options you have set in Creo, you will be presented with a dialog box similar to the one shown below. Allow the pipe file to be checked out. This will check out the pipe solid, save the new pipe over the old one, and complete the process.
Once you've completed this process, Check in your work. The new pipe will now replace the old pipe in Windchill and in your piping assembly. As I said, this is a bit of a chore but it does work. You can reuse the same pipe names over and over again without making useless pipes that stay in Windchill forever.
I hope this makes sense!
Good luck!
-Brian
Announcements
Top Tags
